0m (1:45) Models >
Prototype >
Thamshavnbanen
-An introduction
Misc.>
Westinghouse electric engine 1-3
The most active of my projects at the time of writing
is a model of Westinghouse engine 1-3. This Project was started way back
in 1993. In the large pile of documentation I found a drawing dated 01.07.93.
This drawing is based on a surprisingly incorrect drawing published in
various publications.
My quite amateurish drawing is also in 1:48 scale which means it was made
before I got in contact with the three grand men of Scandinavian 0-scale,
(Walde, Ljung and Olsen).
We have since converted to the Scandinavian flavour of 0-scale, which
means 1:45 scale.
The first serious round of documentation was measuring and photographing
engine number 3. Some time later we were able to borrow the original blueprints
from the archives of Salvesen og Thams.
CAD drawings were made based on this documentation.
It might seem that the measuring of the prototype was wasted time when
the blueprints surfaced. But even construction blueprints can differ from
the engine built. So you should use all the sources of information and
crosscheck.
The prototype
 |
 |
 |
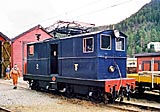
Three engines of this class were delivered for the opening
of the line in 1908. The engine has three traction motors with a combined
pulling power of 50 tons. Top speed was 40 km/h. The engines were used
in all types of trains, including helper service and switching.
During World War II saboteurs blew up all the engines. Two of them were
rebuilt after the war. Both these engines are preserved, one at the TB
museum at Løkken ant the other at the technical university of Trondheim.
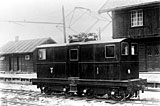
Some details have been changed during the career of the engines. The pantographs
have at least been changed once. Originally they were delivered with the
same pantograph as the ”Royal Car”. I have measured the remains
of one of these pantographs. Some critical parts were missing, so I still
have some research to do on them.
An extra headlight was added at some time, and this headlight has also
been moved around a bit.
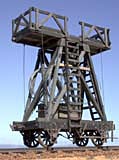
The engines were also delivered with impressive snowploughs. I have not
found drawings of them, or seen pictures of them in service. It is such
a nice detail, though, that I really want to include it on my model as
a removable part.
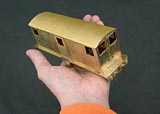
The Model
This is a really nice engine to recreate in model. It
is of a simple design, but has enough details to make it interesting.
It reminds me quite a lot of the American boxcab electrics of the thirties/forties.
Check out the article on the late Bob Hegges Boxcab Electric in September
MR 1979. Bob hegges work have really been and inspiration to me.
I tried to build an engine using hand-punched rivets and hands awing all
the parts. But around 1996 I discovered the power of Photo-Etching. An
article by Mads Björklund (Published in a book by Allt Om Hobby 1996)
described how to make digital drawings for the etching artwork. It was
really a revelation. The hand made parts went into the scrap box. At a
feverishly pace artwork were prepared and shipped off to England for etching.
The result was a beautiful A3 brass-sheet of absolutely useless parts.
But it was an important learning lesson. I grit my teeth and went back
to the Mac. This time I put in a lot more effort in the drawing. This
really paid off. The second edition is build able, but I will make a third
edition. This version will remove quite a few bugs and include some more
arts. But I will also split the project into two sheets, one in 0.3 mm.
and the other in 0.5 mm. Some of the parts are quite flimsy in 0.3 mm.
I cannot stress the importance of putting enough time and energy into
the artwork. Twenty minutes extra work on the computer can easily save
you hours of building time. This is no exaggeration.
- Superstructure
- Trucks
- Frame
- Pantograph
Superstructure
 |
 |
 |
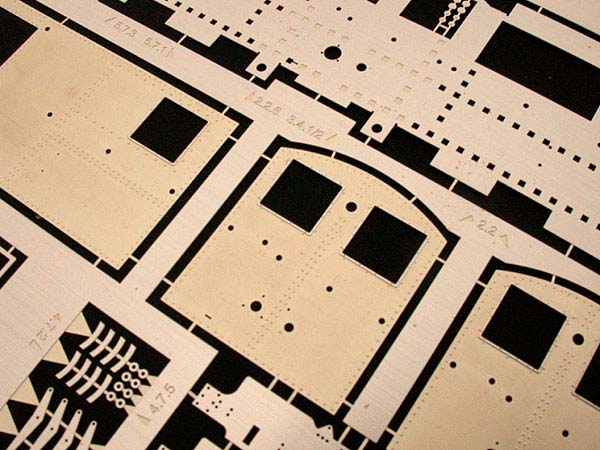
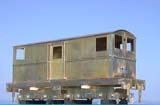
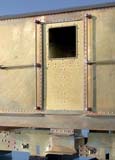
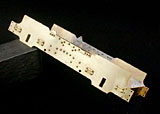
The superstructure is where etching really pays off. The zillions of rivets
on the bodywork are etched. Window frames are also etched in relief. The
possibility of making relief details is one of the big strengths of two-sided
etching. The only problem is that the half-thick parts can be quite flimsy.
The superstructure consists of an inner box built in full thickness brass,
with an overlay of half-thick brass with the rivet details. The two layers
were laminated together with solder. This was quite an elaborate process
involving solder paste, various jigs and a cooking plate!
The frame is built around a main plate of 0.5mm brass with milled brass
profile sides. The endplates are detailed with a frightening amount of
Old Pullman rivets
and scale sized hex bolts and nuts in brass. Made by the German company
Nolte, and they have to be seen to be believed.
Couplers are by Erik Walde. This Swedish ”cottage manufacturer”
makes a really beautiful working ” Norwegian coupler” (yes,
they are really called that. But not here in Norway!) in cast brass. These
parts are made by Korea Brass as well.
The crowning detail is yet to be made. For a model like this you really
need etched nameplates. But this needs to be made in a thinner material
and is not really suited to be included o a regular sheet. I plan to make
a sheet with all the nameplates, signs and similar stuff and etch it as
a separate sheet.
Trucks
 |
 |
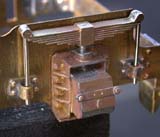 |
The trucks are mainly made up of etched brass. The main parts
will be in 0.5mm on the final version of the etch. The pictures show a
first version in 0.3mm. The rivets are Old Pullman brass rivets inserted
in etched holes and soldered from the back.
The journal box and leaf springs are a brass casting custom made in Korea
from my own master. This is a surprisingly fast and reasonably priced
process. I will provide more details about this casting project in a separate
article.
The trucks are divided into two entirely separate assemblies. The one
shown here is purely cosmetical. It will be supported by a more sturdy
construction that will include the wheels, bearings and necessary gearboxes
(see the section on wheels and driving mechanism)
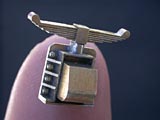
The pantograph
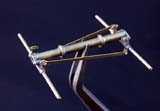
This is the biggest headache so far. I haven´t quite got the working mechanism right yet, and I have no prototype plans to work from. More research and test parts are needed. But I am quite sure the desing will involve quite a lot of 0.6mm nickel silver wire and brass tubing of various dimensions. And a liberal sprinkeling of photo-etch, of course.
The picture to the right shows the progress so far. It looks quite nice, but I have some doubts if the mechanism will operate properly.
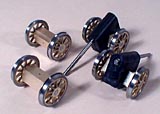
The driving mechanism
 Maybe
the biggest challenge of a scratchbuilding project is finding suitable
wheels and a driving mechanism. The wheels and bearings for this engine
are custom-made by Erik
Olsen in Denmark. The wheels are of course made to the same standards
as the spoked wagon wheels.
Maybe
the biggest challenge of a scratchbuilding project is finding suitable
wheels and a driving mechanism. The wheels and bearings for this engine
are custom-made by Erik
Olsen in Denmark. The wheels are of course made to the same standards
as the spoked wagon wheels.
All the wheels have roller bearings. North West Shortline makes gearboxes and other parts for the driving mechanism. A Faulhaber 2232SR motor will drive the model.
I still have to find a way to machine two brass driving wheels for the transmission. But all the hard work was done by Mr. Olsen, and I am extremely happy these obstacles have been overcome. At first I hand-made the inner boogies from 1mm brass sheet, but I am not happy with the precision of my work. So they will be included on the 0.5 mm sheet.
Painting and weathering
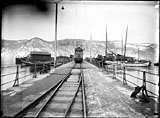
A quite futuristic concept at the moment. But I will put my old etchings to use as test subjects for painting (so far they hav served me well as solder test dummies). I am heavily influenced by the master painters of miltary models, and I will experiment with techniques from that field. Check out the "Missing Lynx" for examples of outstanding painting an weathering work. Even in the black and white pictures of the engines in prewar service you can see that they are heavily weathered complete with very nice rust streaks.
Finding the right shades of the colors is also a challenge. Prewar color pictures is not easy to find. But I guess the colors must have been quite faded.
The biggest challenge is probably the striping. Getting neat lines around all the rivet details seems like no fun. One possibility is of course to just ignore the stripin. The restorers of engine number ignored them, so why shouldn´t I turn a blind eye to them as well? But I know I will bite the bullet in the end. I have pulled out all the stops so far, and I have to go the full distance!
To be continued.